
If you’re thinking about restoring an old bathtub without paying for a full replacement, the Sealin’ Ekopel Bathtub Refinishing Kit is one of the products worth considering.
I found it appealing because it promises a thick, glossy finish that lasts for years while costing far less than hiring a professional.
If you want to save money, refresh a worn bathtub, and enjoy a DIY project with professional-looking results, this kit deserves a close look before you make your decision.
My Experience Using The Sealin’ Ekopel Bathtub Refinishing Kit
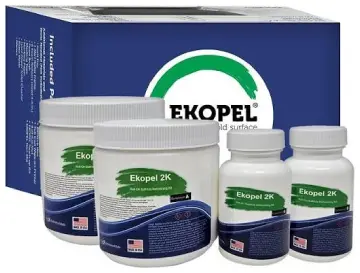
When I first decided to refinish my bathtub, I had two choices. I could spend thousands replacing the tub or try a refinishing kit that promised a durable factory-like finish.
After reading numerous Sealin’ Ekopel bathtub refinishing kit reviews, I decided to give it a chance.
The first thing I noticed was that this isn’t your average paint kit. The material feels much thicker than standard bathtub paint, and that immediately gave me confidence.
Instead of brushing or rolling on thin coats, the product slowly flows across the bathtub surface, creating a smooth finish when applied correctly.
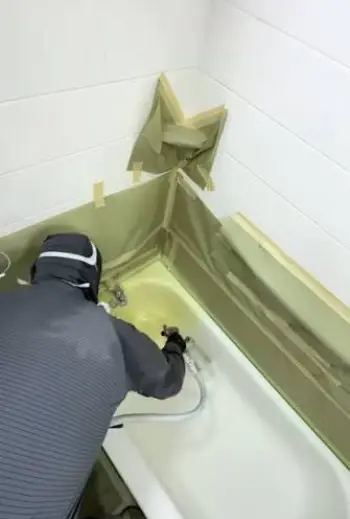
Preparation consumed most of my time. I thoroughly cleaned the bathtub, removed soap residue, repaired small chips, and lightly sanded the surface.
Although preparation required patience, I quickly realized it was the most important part of the entire project. Any shortcuts here would likely affect the final appearance.
Mixing the two components was straightforward, but timing mattered. Once mixed, I had a limited window to pour and spread the coating
I carefully followed the recommended pouring technique around the edges before allowing gravity to distribute the coating across the tub.
Watching the coating level itself was surprisingly satisfying. Small streaks gradually disappeared, and the finish became smoother over time.
I resisted the temptation to keep touching it because I learned that excessive adjustments often create imperfections.
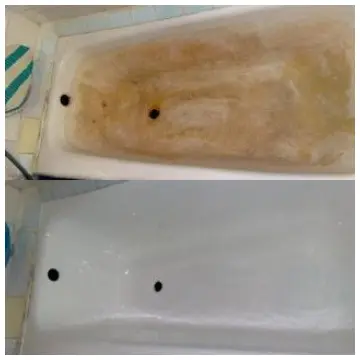
After the curing period, the transformation exceeded my expectations. My old, stained bathtub looked dramatically newer.
The glossy finish reflected light beautifully, making the entire bathroom appear cleaner and brighter.
That said, the project wasn’t completely stress-free. Proper ventilation was essential, careful measuring mattered, and waiting for the coating to cure tested my patience. However, once everything hardened, I felt the effort had been worthwhile.
Would I use it again? Yes, especially if I wanted to avoid replacing another bathtub. The finished surface felt solid, looked premium, and gave my bathroom an impressive makeover without the expense of installing a brand-new fixture.
Pros Of Sealin’ Ekopel Bathtub Refinishing Kit
- Professional-Looking Finish
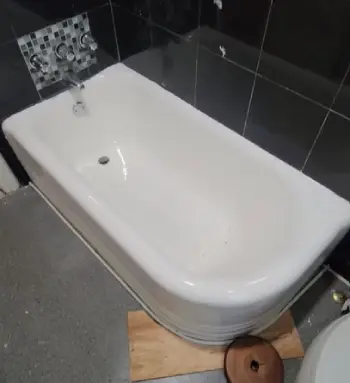
The biggest advantage I experienced was the final appearance. The thick coating created an impressive glossy surface that resembled a professionally reglazed bathtub.
Friends who visited my home assumed I had installed a completely new tub.
Unlike many brush-on products, the self-leveling formula helped eliminate many visible application marks, resulting in a cleaner and more uniform finish.
- Excellent Value for Money
Replacing a bathtub can become surprisingly expensive once labor, plumbing adjustments, tile repairs, and disposal fees are included.
Using this refinishing kit allowed me to achieve a dramatic bathroom upgrade for only a fraction of that cost.
If your bathtub is still structurally sound, refinishing offers exceptional financial value compared to full replacement.
- Thick Protective Coating
One aspect that impressed me immediately was the coating thickness.
Instead of producing a thin painted appearance, the material formed a durable shell over the bathtub surface. This added thickness contributes to both the visual quality and the overall durability of the finish.
The coating also helped hide years of surface wear that cleaning products alone could never remove.
- Compatible With Multiple Bathtub Materials
Another benefit is its versatility.
Whether your bathtub is porcelain, fiberglass, cast iron, or acrylic, the kit can work effectively when proper preparation guidelines are followed.
That flexibility makes it suitable for many different homes without requiring specialized products for each tub type.
- Smooth Surface Improves Cleaning
After refinishing, I found routine cleaning became noticeably easier.
Soap residue, shampoo, and mineral deposits had fewer rough areas to cling to, allowing me to wipe the tub clean with far less effort than before.
This smoother surface also helped maintain the glossy appearance for longer periods between cleanings.
- Budget-Friendly Bathroom Makeover
Perhaps my favorite advantage is how dramatically it transformed the bathroom.
Instead of living with an outdated yellowed bathtub or spending thousands on replacement, I achieved a modern-looking finish that refreshed the entire room.
Even replacing mirrors or repainting walls wouldn’t have made as dramatic a difference as restoring the bathtub itself.
- Long-Lasting Investment
When properly applied and maintained, the coating offers durability that many homeowners appreciate.
Rather than requiring yearly touch-ups, the finish is designed to remain attractive through years of regular household use.
That long service life makes the initial effort feel worthwhile.
- Satisfaction of Completing It Yourself
There’s also personal satisfaction in completing the project.
Looking at the finished bathtub knowing I restored it myself made the experience even more rewarding. While preparation required patience, seeing the final glossy finish made every hour feel worthwhile.
Cons Of Sealin’ Ekopel Bathtub Refinishing Kit
- Surface Preparation Takes Longer Than Expected
The biggest challenge wasn’t applying the coating—it was preparing the bathtub.
I spent far more time cleaning, sanding, removing old caulk, and eliminating soap scum than I originally planned.
Every bit of residue has the potential to interfere with adhesion, so rushing this step simply isn’t an option.
If you’re expecting a quick afternoon project, you may be disappointed. Most of the work happens before you even open the coating.
- Timing Is Important
Once the two components are mixed, the clock starts ticking.
You need to work steadily without unnecessary delays. I found this slightly stressful because I wanted to make sure everything was poured correctly before the coating began thickening.
If you’re easily distracted during DIY projects, it’s worth having everything prepared in advance.
- Requires Patience During Curing
One of the hardest parts for me was waiting.
After seeing the bathtub look almost finished, I naturally wanted to start using it. However, the coating needs sufficient curing time to reach its full hardness.
Using the tub too early could damage the finish, making all the previous effort pointless.
- Strong Odor During Application
Like many refinishing products, this coating produces noticeable fumes during application.
Good ventilation is extremely important. I opened windows, used fans, and avoided spending unnecessary time inside the bathroom while the coating cured.
The odor eventually disappeared, but it’s something every buyer should expect.
- Mistakes Can Be Difficult to Correct
Unlike ordinary paint, this isn’t a product you can simply wipe away and start over.
If you accidentally introduce dust, leave debris on the surface, or make major application errors, fixing them afterward can require sanding and additional refinishing.
That’s why I recommend reading the instructions carefully before mixing the product.
- Not Ideal for Severely Damaged Bathtubs
Although the coating hides many cosmetic flaws, it won’t repair structural damage.
Deep cracks, major rust holes, or unstable fiberglass still need proper repairs before refinishing.
If your bathtub has significant damage, replacement may ultimately be the better investment.
- Environmental Conditions Matter
Temperature and humidity can influence the final outcome.
Applying the coating in conditions outside the recommended range may affect leveling, curing time, and overall appearance.
For that reason, I planned my project during favorable weather instead of rushing to complete it on an inconvenient day.
Maintenance Tips For Sealin’ Ekopel Bathtub Refinishing Kit
- Wait Until the Coating Fully Cures
The first maintenance step actually begins before you use the bathtub.
Although the surface may appear dry, it continues hardening beneath the glossy finish. I followed the recommended curing period without taking shortcuts because I wanted the coating to reach maximum strength.
Waiting a few extra days was far easier than risking permanent damage.
- Use Gentle Cleaning Products
After refinishing, I completely changed how I cleaned the bathtub.
Instead of harsh powders or highly abrasive chemicals, I switched to mild liquid bathroom cleaners and a soft sponge. The smooth finish cleans easily, so aggressive scrubbing simply isn’t necessary.
Gentle cleaning preserves the shine while reducing unnecessary wear.
- Avoid Abrasive Scrubbers
Steel wool, stiff brushes, and rough scouring pads can gradually dull even a high-quality refinished surface.
I now use microfiber cloths or soft non-abrasive sponges for nearly all cleaning tasks.
This simple habit helps maintain the glossy appearance without sacrificing cleanliness.
- Clean the Tub Regularly
Regular cleaning prevents soap scum and mineral deposits from building up.
Rather than allowing residue to accumulate for weeks, I wipe the bathtub down every few uses. Because the surface is so smooth, routine cleaning takes only a few minutes.
This approach keeps the tub looking freshly refinished much longer.
- Don’t Drop Heavy Objects
The coating is durable, but it’s not indestructible.
Dropping metal shower heads, heavy shampoo bottles, tools, or other hard objects can chip almost any refinished bathtub.
I became more mindful about handling bathroom accessories, especially while cleaning shelves above the tub.
- Repair Plumbing Leaks Quickly
Constant dripping water can leave stubborn mineral deposits over time.
If you notice a leaking faucet, fixing it promptly helps protect both the appearance and cleanliness of the refinished surface.
Ignoring small plumbing issues often creates larger maintenance problems later.
- Avoid Bath Mats With Strong Suction Cups
Many rubber bath mats use powerful suction cups that repeatedly pull against the refinished surface.
To reduce unnecessary stress on the coating, I either use non-suction alternatives or remove the mat after each bath instead of leaving it attached for weeks.
- Rinse Away Soap After Every Bath
A quick rinse with clean water makes a noticeable difference.
It removes leftover shampoo, soap, and bath products before they dry onto the surface.
This simple habit reduces cleaning time while helping preserve the glossy finish.
- Dry the Surface Occasionally
Although it isn’t required after every use, wiping the bathtub dry with a soft towel helps prevent water spots in areas with hard water.
I especially recommend this if your home has high mineral content in the water supply.
- Avoid Harsh Chemical Drain Cleaners Contacting the Finish
When clearing slow drains, I take care to avoid spilling aggressive drain chemicals across the refinished surface.
If any cleaner accidentally touches the coating, I rinse it away immediately with plenty of water.
Small precautions like this help preserve both the color and gloss.
- Inspect the Finish Periodically
Every few months, I examine the bathtub under bright lighting.
Checking for tiny chips, scratches, or worn areas allows me to address minor issues before they become larger cosmetic problems.
Preventive maintenance is always easier than major repairs.
- Treat the Finish Like a Premium Surface
The biggest lesson I learned is that refinished bathtubs should be treated similarly to a high-quality countertop or appliance.
With careful use, gentle cleaning, and basic attention, the finish continues looking attractive year after year. The maintenance routine isn’t demanding, but consistency makes all the difference.
Comparison Of Sealin’ Ekopel Bathtub Refinishing Kit With Other Brands
- Sealin’ Ekopel vs. Rust-Oleum Tub & Tile Refinishing Kit
Rust-Oleum is one of the most recognizable names in the DIY refinishing market. It’s generally easier to find in local home improvement stores and often costs less than the Sealin’ Ekopel kit.
From my perspective, the biggest difference is the coating itself. Rust-Oleum applies more like traditional epoxy paint, while Sealin’ Ekopel creates a thicker, self-leveling layer.
That extra thickness gave my bathtub a richer, more professional appearance.
Rust-Oleum can produce excellent results when applied carefully, but I found that brush or roller marks are more likely to appear if the application isn’t consistent.
Ekopel’s pouring method reduces that issue because the coating naturally spreads across the surface.
If your priority is the lowest upfront cost, Rust-Oleum is an attractive option.
your goal is achieving a finish that resembles professional reglazing, I believe Sealin’ Ekopel has the advantage.
- Sealin’ Ekopel vs. Homax Tough as Tile
Homax Tough as Tile is another popular DIY refinishing product aimed at homeowners looking for an affordable bathroom makeover.
In my opinion, Homax works well for refreshing tubs that only have minor discoloration. However, Sealin’ Ekopel feels more substantial once cured.
The finished coating appears thicker, smoother, and more resistant to everyday wear.
I also preferred the overall gloss produced by Ekopel. It reflected light more evenly and made the bathtub look newer rather than simply painted.
Homax may be easier for complete beginners because of its more familiar application style, but I felt Ekopel rewarded careful preparation with a higher-end finish.
- Sealin’ Ekopel vs. Bathworks Refinishing Kit
Bathworks has earned a reputation among homeowners who want durable DIY refinishing products.
Comparing the two, I found both capable of delivering impressive results when applied correctly. The difference comes down to the application process and final appearance.
Ekopel’s self-leveling coating minimizes visible application marks and creates a thick surface that closely resembles factory enamel. Bathworks also offers durability, but the final finish may depend more heavily on application technique.
If I wanted the smoothest possible appearance without extensive brushing or rolling, I would still choose Sealin’ Ekopel.
- Sealin’ Ekopel vs. Professional Bathtub Reglazing
Hiring professionals remains the premium option for bathtub restoration.
Professional reglazing usually delivers excellent results because experienced technicians have commercial equipment, specialized coatings, and years of practice.
However, professional services can cost several times more than purchasing the Sealin’ Ekopel kit.
After completing my own project, I honestly felt the savings justified the effort.
While a professional may achieve an even more flawless finish, my refinished bathtub looked impressive enough that many visitors assumed it had been professionally restored.
For homeowners comfortable following instructions and investing time in preparation, Ekopel offers outstanding value.
Is The Sealin’ Ekopel Bathtub Refinishing Kit Worth Buying?
After using the kit and evaluating its strengths and weaknesses, I believe it offers excellent value for homeowners who want to restore an aging bathtub without paying for a full replacement.
The project requires patience, careful preparation, and attention to detail, but the reward is a glossy, durable finish that dramatically improves the appearance of the bathroom.
I appreciated how the coating concealed years of wear while making routine cleaning much easier.
This isn’t the right solution for severely damaged tubs or for anyone unwilling to spend time preparing the surface properly.
However, if your bathtub is structurally sound and simply looks worn, stained, or outdated, I think Sealin’ Ekopel is one of the stronger DIY refinishing options available.
The overall experience left me satisfied with both the appearance and the value. Instead of replacing an otherwise functional bathtub, I achieved a fresh, modern look for a fraction of the cost.
Also Read: Is Xall Toilet Cleaner Worth It?
Frequently Asked Questions (FAQ)
Yes. If your bathtub is structurally sound, Ekopel offers an affordable way to achieve a durable, glossy finish without replacing the tub.
The best kit depends on your needs, but Sealin’ Ekopel stands out for its thick self-leveling coating, professional-looking finish, and long-lasting durability.
When applied correctly and maintained with gentle cleaning, Ekopel can last for many years under normal household use.
Ekopel 2K generally provides a thicker, smoother, and more durable finish than many brush-on epoxy refinishing kits, making it a strong choice for homeowners seeking professional-looking results.
Wrapping Up
If you want to give an old bathtub a fresh new life without the expense of replacement, I believe the Sealin’ Ekopel Bathtub Refinishing Kit is a worthwhile investment.
It takes time, careful preparation, and patience, but the glossy finish and long-lasting results make the effort worthwhile.
For homeowners who enjoy tackling DIY projects and want a bathroom upgrade on a reasonable budget, this kit delivers impressive value and can completely transform the look of a worn bathtub.
Recent Posts
I spent months comparing budget options against established names after my last set of tires wore out sooner than expected.My goal here is to share what I learned from putting Dextero and...
AquaTru Carafe Vs. Classic: Which Is Actually Fits Your Kitchen?
I decided to write this comparison after months of testing both the AquaTru Carafe and the Classic in my own kitchen. Tracking covered daily use.Taste stayed consistent. Refill frequency...