
I decided to figure out the better way to raise my patio cover after dealing with a low, dark, leaky setup that made outdoor time less enjoyable than it should be.
My main goal here is to compare patio roof risers and SkyLift systems side by side so you can see which one fits your space, budget, and comfort needs without the usual headaches of traditional attachments.
| Aspect | Patio Roof Riser | SkyLift |
| Mounting Method | On top of roofing, outside building envelope | Through roof to wall top plate |
| Pitch Adjustment | Patented pin-locking adjustable | Height options (12-36 in) set the pitch |
| Waterproofing | Pre-installed butyl seal | Standard pipe flashing |
| Load Capacity | Engineered high (around 1830+ lb connection) | Heavy-duty versions tested to 1000+ lb loads |
| Spacing Recommendation | Every 4 ft with 2 ft cantilever | Based on beam and structural design |
| Headroom & Light | Raises cover for more space and light | Creates gap for light, airflow, chimney effect |
| Debris & Leak Risk | Reduces by elevating and sloping | Strong reduction via separation from house roof |
| Installation Complexity | Less invasive, no major roof cutting | Requires cutting sheathing for top plate access |
| Best For | DIY-friendly, existing roofs without major remodel | Heavier structures, high wind/seismic needs |
Understanding Patio Roof Risers From My Experience
I first looked at patio roof risers because I wanted something that would not force me to tear into the main house structure.
These are patented structural hardware pieces made to lift a patio cover, pergola, or deck roof away from the traditional low attachment points.
They sit on top of the roofing material, usually composition shingles or certain metal roofs, and connect into rafter tails or blocking installed between them.
The design keeps everything outside the dry interior space of the house. That alone reduced my worry about long-term liability and water intrusion.
The LO-PRO style puts the beam right into a bucket-like saddle for a lower profile, while the post-mount version lets you use a 4×4 post for more height flexibility. Both use steel alloy pins and a grade 8 bolt so the pitch locks in solidly once set.
Key features I noticed right away included the corrosion-resistant powder coat finish, availability in stainless for coastal spots, and the fact that they come with engineering documents you can hand over if your local building department asks.
They eliminate the need for ground posts right against the house wall, which opened up my patio floor space for furniture and walkways.
Key Differences Between Patio Roof Risers And SkyLift

- Mounting location and invasiveness: Patio roof risers stay on the surface and attach outside the wall line.
You avoid cutting into the roof sheathing in most cases. SkyLift requires opening the sheathing to reach the top plate.
This feels more structural but needs careful flashing afterward.
- How pitch and height get set: Patio roof risers use an adjustable pin-and-bolt system. It locks any reasonable angle on the spot.
SkyLift relies on choosing the right riser length. Then you set the outer posts accordingly.
This gives fixed height steps rather than infinite adjustment.
- Waterproof approach: Patio roof risers rely on a factory butyl seal under the base.
It claims multi-decade performance and even supplies replacements for re-roofing.
SkyLift uses conventional pipe flashing. Roofers already know how to install and maintain it.
- Structural load path: Patio roof risers transfer load into the rafter tails or added blocking just outside the wall.
SkyLift sends the load straight into the wall top plate.
Many engineers prefer this for heavier or high-wind applications.
- Visual and spatial result: Both raise the cover for better headroom and light. SkyLift’s through-roof design often produces a slightly larger continuous air gap.
This enhances the chimney effect. Patio roof risers can achieve a tighter, lower-profile look with the LO-PRO option.
- Installation skill level: Patio roof risers feel more DIY-friendly. You need to be comfortable working on a roof surface.
SkyLift installation benefits from someone experienced with roof penetrations and flashing details.
- Long-term service access: Patio roof risers keep most of the roof surface intact for future work.
SkyLift requires working carefully around the flashings during any re-roof.
Both still beat traditional low attachments for ease of upkeep.
Key Features Of Patio Roof Risers
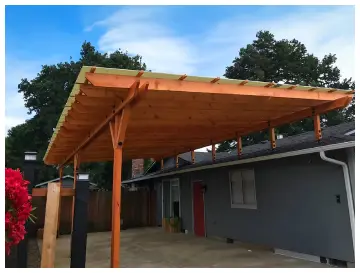
- Adjustable pitch with positive lock: Two steel-alloy pins plus a grade 8 bolt hold the chosen angle.
It does not slip under load or wind.
- Waterproof base seal: The pre-installed butyl gasket keeps water out at the mounting surface.
It simplifies future re-roofing.
- Engineered spacing and capacity: Designed for placement every four feet with a two-foot cantilever allowance.
This delivers a strong connection rated for substantial loads.
- Finish and material options: Powder-coated steel is standard. 316 stainless handles salt air.
Styles include LO-PRO for low profiles and post-mount for taller setups.
- Outside-the-envelope placement: Keeps the attachment point beyond the main building envelope.
This reduces liability concerns and simplifies permits in many areas.
- Beam compatibility: Accepts common 4x lumber sizes without special adapters.
Pros Of Patio Roof Risers
- Lower disruption to the existing roof: You mount on top of the current roofing in most cases. The job stays simpler and less invasive.
- True pitch adjustability on site: Locking the exact angle you need after the beams are in place removes a lot of guesswork.
- Strong waterproof claim with replacement seals: The butyl system is designed for decades. The company supplies new material when you re-roof.
- Space-saving attachment: No posts against the house wall means more usable patio area. You gain room right where you want furniture or traffic flow.
- Code-friendly engineering documents: Stamped papers travel with the product. This can speed approval in jurisdictions that require them.
- Versatile styles for different looks: LO-PRO keeps the profile clean for simple shade structures. Post-mount opens more design possibilities.
- Reduced debris buildup: Elevating the cover lets water and leaves slide off more freely. You spend less time cleaning the roof surface.
Cons Of Patio Roof Risers
- Surface mounting still needs solid framing below: You must hit rafter tails or install blocking correctly. Missing solid lumber weakens the connection.
- Spacing rules limit layout freedom: The four-foot on-center guideline means longer beams need more units. This raises hardware cost.
- Potential for surface wear over decades: Even with good seals, any product sitting on roofing material faces ongoing weather exposure.
- Limited height without the post-mount version: The basic LO-PRO stays relatively low. Extra height requires the taller post style and longer lumber.
- Not ideal for every roof type: Corrugated metal or highly irregular surfaces may need extra preparation. They may not work cleanly without modifications.
- Initial measurement precision: Accurate placement over framing is essential. Small errors can affect the final pitch lock.
Key Features Of SkyLift
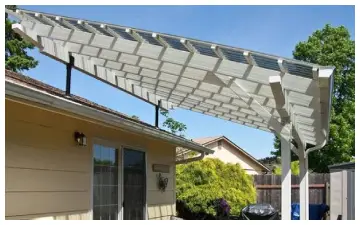
- Through-roof top-plate attachment: Bolts secure the riser directly to the wall framing.
This creates a solid load path that roofers and engineers recognize.
- Multiple height choices: Options from roughly 12 inches up to 36 inches let you match steep roofs.
You can also create generous headroom.
- Standard flashing compatibility: Uses ordinary pipe jack flashings.
The seal matches existing roof practices and is easy for any roofer to service.
- Duty ratings and testing: Standard duty suits lightweight covers.
Heavy-duty versions have been lab-tested for higher perpendicular, parallel, and uplift forces.
- Lateral stability accessories: Optional straps and designer saddles give extra rigidity.
They also add design flexibility for different beam or post configurations.
- Chimney-effect airflow: The intentional gap between roofs promotes continuous ventilation.
It carries heat and smoke upward and out.
- Saddle design flexibility: The top saddle accepts standard beams and can be oriented for different framing styles.
This supports both shed and gable-style covers.
Pros Of SkyLift
- Direct connection to structural framing: Bolting to the top plate gives a clear, reliable load path. It feels reassuring in windy or seismic zones.
- Proven gap for light and air: The raised design consistently improves natural light into the house and patio. It also vents heat effectively.
- Familiar flashing method: Roofers already understand pipe jacks. Long-term maintenance and future re-roofing stay straightforward.
- Range of heights and duty levels: You can pick the exact rise and strength rating that matches snow load, wind, or cover weight.
- Preserves existing gutters: Water continues to flow into the original system without redesign.
- Effective debris and leak reduction: Separating the two roofs stops the classic low-slope problems. Standing water and trapped leaves become far less common.
- Strong tested performance: Lab results for heavy-duty models show high resistance to uplift and lateral forces. This adds confidence in tough climates.
Cons Of SkyLift
- Roof penetration required: Cutting the sheathing and properly flashing the opening adds steps. Error is possible if not done carefully.
- Fixed height steps rather than infinite adjustment: You choose among available lengths. Fine-tuning happens mainly at the outer posts.
- Slightly higher skill demand: Finding the top plate accurately and sealing the penetration correctly benefits from roofing experience.
- Visible risers in some designs: The vertical tubes can show more than a low-profile surface mount. This depends on viewing angle.
- Cost of heavy-duty versions: Higher-capacity units and longer heights push the price up compared with lighter options.
- Temporary support needs during retrofit: Existing covers often require careful bracing while the new risers go in. This adds labor time.
Real-World Performance And Comfort Factors
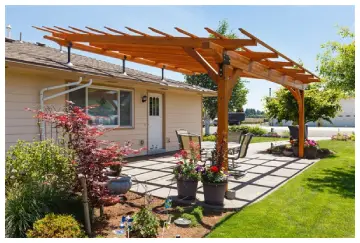
When I walked through both options in my mind for my own patio, the day-to-day differences became clear.
With either system the cover sits higher, so the space no longer feels cave-like. Natural light reaches deeper into the adjacent rooms, and the temperature under the cover stays more comfortable because heat can escape.
I noticed that SkyLift’s continuous gap seemed especially good at moving barbecue smoke upward instead of letting it linger.
Patio roof risers achieved similar airflow once the pitch was set correctly, and the lower profile looked cleaner against certain house styles.
Weight handling matters. Both products are engineered well beyond typical residential patio loads when spaced properly, yet SkyLift’s heavy-duty line has public test numbers that impressed me for high-wind regions.
Patio roof risers advertise a robust connection strength and come with the engineering paperwork ready for inspectors.
In practice I would still have a local engineer review the full assembly, including outer posts and footings, because the risers are only one part of the system.
Maintenance also differs. Patio roof risers keep the roof surface mostly intact, so re-roofing later means mainly replacing the butyl seals.
SkyLift requires working around the flashings, but those flashings are ordinary parts any roofer can replace.
Debris no longer piles up against the house wall with either choice, which eliminated the ladder climbs I used to dread.
Installation Considerations From A Homeowner Viewpoint
I weighed the labor. Patio roof risers let me work mostly from the roof surface after locating the framing.
Measuring every four feet, setting the hardware, locking the pitch, and dropping the beam felt methodical.
SkyLift demanded temporary support of the existing cover if I was retrofitting, then careful cutting, bolting to the plate, flashing, and saddle installation. Both approaches remove the old low attachment and free the outer posts to stand taller for better sight lines.
Cost comparison depends on span and duty level. Hardware alone for a modest patio might run a few hundred dollars either way, but total project cost includes lumber, roofing panels, labor, and any engineering review.
DIY-friendly features of the patio roof riser can save on labor, while SkyLift may appeal more to a contractor already comfortable with roof penetrations.
Climate played a role in my thinking. In rainy areas the improved pitch from either product reduces leaks dramatically.
In hot climates the airflow gap keeps the space usable longer into the afternoon. Snow country calls for the higher-capacity versions and proper outer post design.
Making The Choice For Your Own Patio
After lining up the details, I realized the decision rests on three practical questions. First, how invasive do you want the roof work to be?
Surface-mount patio roof risers win if you prefer minimal cutting. Second, do you need continuous height options or will discrete riser lengths work?
Third, what does your local code and climate demand for attachment strength and documentation?
Both systems solve the classic problems of low slope, trapped heat, blocked light, and debris accumulation.
They free the patio floor from unnecessary posts near the house and let the cover sit at a height that feels open rather than cramped.
I found myself leaning toward the adjustable pitch and outside-envelope design of patio roof risers for a straightforward retrofit, yet I fully respect SkyLift’s direct structural connection and proven ventilation gap for more demanding sites.
Also Read: Comparison Of Pergolux And Bon Pergola
Frequently Asked Questions (FAQ)
Yes, when properly spaced and installed they provide a strong, adjustable, waterproof connection that raises the cover for better light, airflow, and drainage.
Divide the beam length by four; place one every four feet with up to a two-foot cantilever at each end.
It elevates a patio cover or pergola above the house roof by mounting through the roof to the wall top plate, creating headroom, light, and ventilation while using standard flashing.
Both types are engineered for substantial residential loads when correctly spaced; heavy-duty versions handle higher forces, but always confirm with site-specific engineering.
Wrapping Up
I started this comparison because I wanted a patio that felt open, bright, and dry instead of dark and problematic.
You now have a clear side-by-side view of patio roof risers and SkyLift so you can match the hardware to your roof type, climate, and comfort goals. Whichever route you take, raising the cover transforms the outdoor space and protects the house roof at the same time.
Measure your span, check local requirements, and choose the system that lets you enjoy the patio the way you always intended.
Recent Posts
I spent months comparing budget options against established names after my last set of tires wore out sooner than expected.My goal here is to share what I learned from putting Dextero and...
AquaTru Carafe Vs. Classic: Which Is Actually Fits Your Kitchen?
I decided to write this comparison after months of testing both the AquaTru Carafe and the Classic in my own kitchen. Tracking covered daily use.Taste stayed consistent. Refill frequency...